Category Archives: Recipes

bluebread

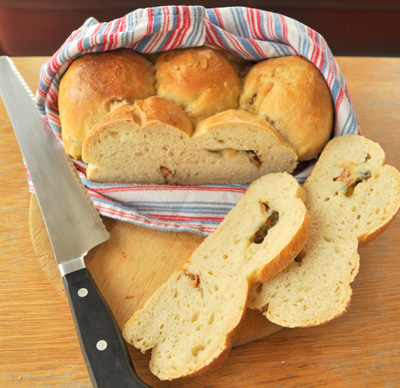
Bacon & Bellingham Blue Cheese Loaf

Bacon & Bellingham Blue Cheese Loaf

I made this during my cookery demonstration at Taste of Togher recently and it went down a storm! I promised a few people that I would post the recipe on the blog so here goes! This is a hearty &  filling bread that is very easy to make. It’s a great bread to have in your freezer too as it is perfect for toast in the morning-a whole breakfast in a slice! (well almost) We are very lucky to have such a fantastic local blue cheese here in Co. Louth- Bellingham Blue Cheese and I love using smoked streaky bacon in this bread.

“Proving” popular at Taste of Togher! (sorry couldn’t resist)

Ingredients:

650g strong white flour

1 teaspoon salt

1 tablespoon sugar

14g pack fast acting yeast (2 x 7 g packs)

3 tablespoon Derrycamma rapeseed oil

350-400ml lukewarm water

4 rashers of smoked streaky bacon, cooked & chopped

150g Bellingham blue cheese, crumbled

1 egg, whisked

Method:

  1. Put the flour and salt into a large bowl, add the sugar and yeast.
  2. Make a well in the centre, add the oil and water.
  3. Gradually work into the flour to make a soft dough.
  4. Sprinkle over a little flour if the mixture feels too sticky, but make sure it is not too dry- the dough should be pliable and smooth.
  5. Transfer the dough to a lightly floured work surface, knead for 10 minutes  (sprinkling a little flour on when needed) until the dough is smooth and stretchy (soft but elastic).
  6. Cover with cling film and let rise in warm spot until doubled in volume, about 1 to 1½  hours.
  7. Sprinkle the bacon & Bellingham blue cheese  into the dough and ensure they are buried in
  8. Pull pieces of the dough off and shape into balls by rolling between your hands
  9. Place the balls of dough into a round cake tin in a circle, placing one in the middle( I found a spring release 9” or 23 cm tin useful to do this) and leave for another 10-15mins to allow to rise
  10. Preheat the oven to 220˚ C / 200˚c Fan / Gas 6
  11. Brush a little egg on top of each roll
  12. Bake for 15-20 mins or until they are golden brown.

Went down well at a recent catering job too!


lambburgers

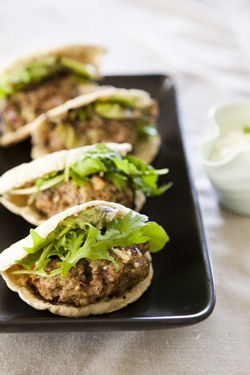
Lamb Burgers with Preserved Lemons and Cucumber Raita

These burgers are absolutely delicious and a slightly healthier version of your average beefburger with all the toppings! A great summery meal that is quick and easy to make and ideal for a BBQ. If you can’t get preserved lemons, use lemon zest instead. You will get a different result but still a very tasty one! I have started to stock preserved lemons here at the Cookery School so give me a shout if you are finding it difficult to find them or you could of course, make your own although you will need to make them about a month before you need them.

Ingredients:

For the burgers:

450 g lamb mince

1 red onion

1 clove of garlic, finely chopped

2 tablespoon fresh oregano (use a teaspoon of dried if you don’t have fresh)

1 tablespoon fresh parsley
1 preserved lemon, finely chopped
1 teaspoon ground cumin
100g feta cheese, crumbled
1 egg, whisked lightly (to bind)

For the raita:

3 tablespoons Greek Yogurt

Fresh mint, finely chopped
½ a cucumber, seeds removed with a teaspoon & diced1 clove garlic, minced or chopped finely

lemon juice

To serve:

Pitta breads & Rocket Leaves

Method:

Combine all the ingredients for the burgers in a bowl, keeping half of the egg back.

  1. Mix thoroughly and check the mix is wet enough to hold together and add more egg if necessary
  2. Season the mixture and cook a teaspoonful of it to taste
  3. Shape into patties and refrigerate if time allows as this helps to keep their shape
  4. Cook on a skillet or pan or best, on the BBQ!
  5. Cook for 5-8 mins on each side, checking the middle of one to ensure it is cooked through
  6. Leave to rest for 5 mins
  7. To make the raita, combine the yogurt, garlic, lemon juice and mint
  1. Cut the cucumber in half lengthways and remove the seeds with a teaspoon
  2. Chop the cucumber finely and add to the yogurt
  3. Taste and adjust seasoning


To Serve:


I love to serve these burgers in lightly toasted pitta bread as it is lighter than burger buns but please feel free to use what you like!


Place the burgers in the pitta breads and top with the raita and some rocket leaves. Dig in!


superfood-smoked-chicken

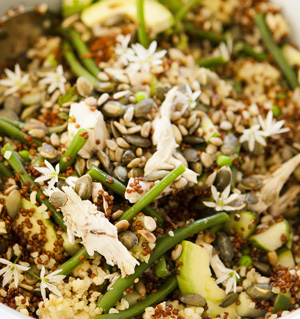
Superfood Smoked Chicken, Quinoa & Bulghur Salad

This is a great fresh-tasting lunchtime or light evening meal with the added benefit of being really quite good for you! It is quick to put together but the flavours pack a punch and leave you feeling nicely satisfied. The avocado, parsley, alfalfa sprouts, peas ,green beans & seeds provide plenty of vitamins, minerals, good fats (avocado) and plant nutrients while Quinoa has a very high protein & fibre content but the bulghur provides your carbs-a meal in one bowl!

Ingredients:

Serves 4

1/2 a Smoked Chicken, sliced (I bought mine from James Whelan Butchers, available to purchase online)

 A large handful green beans, blanched & cooled quickly to retain their green colour & nutrients

50g peas, fresh or frozen, blanched & cooled quickly to retain their green colour & nutrients

½ a  cucumber, diced

A handful of alfalfa sprouts

3 tblsp toasted pumpkin & sunflower seeds

1 avocado, chopped

50g red quinoa ( I like  red quinoa as it has a nuttier texture but feel free to use white, I prefer to cook it for less time than most packs state as I find it can become soggy)

50g cooked bulghur wheat, room temperature

Small handful flat-leaf parsley, roughly chopped

Small handful mint, roughly chopped

2 tblsp lemon juice

3 tblsp extra virgin olive oil

Simply combine all the ingredients above and check for seasoning! Seemples  :-D


Valentine's Day Menu: Dessert of Passionfruit & Mango Tartlets

Passionfruit & Mango Tartlets

This is a really easy and quick dessert to make but is surprisingly satisfying at the same time ! I love the contrast between the tartness of the cinnamon greek yoghurt and the almond flavoured biscuits.

These tartlets can be made in mini tart tins but I am serving them in tall, pretty glasses here.

 (Serves 2)

Ingredients:

30g Amaretti biscuits

30g Digestive biscuits

30g Butter (melted)

150g Greek yogurt

1 Mango, diced

3 Passionfruit, seeds removed

½ teaspoon of ground Cinnamon

1 teaspoon Vanilla extract or the seeds scraped from 1 vanilla pod

A couple of sprigs of mint

1 tablespoon Icing sugar

Method:

  1. Place the biscuits in a food processor and whiz until broken up or place in a bowl and bash with the end of a rolling pin.
  2. Mix the butter in to the biscuits
  3. Pour the biscuit base into the bottom of the glasses and pat down
  4. Leave to chill in the fridge while you get on with the rest.
  5. Place the greek yogurt into a mixing bowl and add the cinnamon & vanilla extract. Whisk gently to combine.
  6. Prepare the fruit by combining the passionfruit with the mango.
  7. You can have everything prepared and in the fridge ahead of time up to this point.
  8. When you are ready to serve, place the greek yogurt mixture on to the biscuit base and spread out evenly.
  9. Pile the mango and passionfruit on top of the yogurt
  10. Place some small, young mint leaves on top and sprinkle the icing sugar over.


Valentine's Day Menu: Main Course of Chermoula Baked Hake with Lime Yoghurt Dressing


I love this quick and easy dish. The flavours of North Africa are a particular favourite of mine and this traditional marinade for fish works particularly well with tabbouleh or just even some plain cous cous.

 Ingredients:

 2 fillets of hake (or any other white fish)

2 cloves of garlic, minced

A pinch of saffron threads, crumbled

2 teaspoons of  ground cumin

2 teaspoons of ground coriander

¼ teaspoon of  chilli flakes

1 tsp paprika

2 tablespoons of finely chopped preserved lemon skin

½ teaspoon of Sea salt

Olive oil

A handful of fresh coriander, roughly chopped

For the yogurt dressing:

2 tblsp Greek Yogurt

Juice & zest of ½ a lime

Method:

To make the chermoula, mix together the garlic, saffron, cumin, coriander, chilli, paprika, preserved lemon, salt and a good glug of olive oil.

To make the yogurt dressing, place the yogurt in a bowl with the lime juice and zest and mix. Season to taste.


  1. Preheat the oven to 180˚C
  2. Place the fish in a baking dish and pour over the chermoula
  3. Cover in tin foil and bake for 20-30 mins, depending on the thickness of your fish.
  4. To check it is cooked, gently open a piece of the fish with a knife and check the flesh is opaque
  5. Serve the fish in it’s sauce and drizzle the yogurt dressing over.
  6. Garnish with the coriander

Valentine's Day Menu: Starter of Chicken Liver Parfait with Plum Chutney

These are my Valentine’s recipes from this issue of Northern Ireland’s Flavour magazine!

To my mind, there is no better way to show someone you love them than a home-cooked meal. The thought and time that goes into planning and cooking it is much more valuable than a teddy bear and a box of chocolates purchased from the local supermarket in my opinion.


I do understand, however, that time might not be on your side so the recipes here are quick and hassle-free. Some of the ingredients are said to have aphrodisiac qualities such as the garlic, coriander and gentle spices of the chermoulla (said to increase the blood flow to certain parts of the body!), the vanilla (said to stimulate the nervous system) and the honey of the tart  (apparently the word “honeymoon” is derived from newly-wed couples drinking a honey beer called Mead to “sweeten” the marriage!)


Whatever about the old wives’ tales, you will enjoy this tasty meal which will be satisfying without being overly heavy.


All recipes serve 2 but the parfait & chutney will serve more. A great leftover to have in the fridge for lunch the next day (if you are lucky!!)


Chicken Liver and Thyme Parfait

Ingredients:


225g Chicken livers, rinse them in milk

225g Butter, room temperature

2 teaspoons of chopped thyme leaves

2 cloves of garlic, finely chopped

A generous measure of brandy (35-40 mls)

Salt & Pepper


Optional: 100g Butter to make clarified butter to top the pate


Melt the butter in a frying pan and add the livers, garlic and thyme with a little salt & pepper.

Cook over a gentle heat, almost poaching them in the butter until the livers are fully cooked. You can check this by opening one of the thicker pieces of liver and checking there is no pinkness in the middle.

Place the mixture in a food processor.

Add the brandy to the pan to deglaze. Place the pan back on the heat and let the brandy bubble up whilst scraping the tasty bits from the bottom of the pan.

Add the rest of the juices from the pan into the food processor and leave to cool for a couple of minutes.

Pulse the livers until fairly smooth and then add the rest of the butter to the mixture.

Taste for seasoning and place into serving dishes. Ramekins work well here. Smooth the pate down if you are topping with clarified butter.Place in the fridge while you make the clarified butter.


For the clarified butter:


Place the butter in a saucepan over a low heat and melt gently. When it has melted, switch the heat off. Do not move the pot. The solids will fall to the bottom leaving the golden clarified butter at the top. Using a small ladle or tablespoon, pour the butter over the surface of the pate and leave to set in the fridge.


Plum Chutney

Ingredients


500g plums, stones removed & chopped

shallots, finely chopped

1 tablespoon olive oil

100ml white wine vinegar

3 tablespoons of water

1 cinnamon stick

100 g demerara sugar

Method


Cut the plums in half down the crease, twist the halves in opposite directions and pull apart. Prize out the stones and discard. Roughly chop the flesh.

Heat the oil gently in a saucepan and add the shallots with a small pinch of salt to prevent them from burning. Soften for about 5 minutes or so

Add the chopped plums, vinegar, water, cinnamon and sugar. Stir until the sugar is dissolved, then simmer for about 15 minutes, stirring occasionally, until softened and slightly thickened.

Place in a kilner jar or bowl and leave to cool and then store in the fridge until ready to use.


Flourless Chocolate & Almond Cake with Orange Ganache

I know it’s January and indulgent an recipe is kind of going against the grain but as I stare out the window at freezing lashing rain and gale force winds, I just want the comfort and endorphin release of this cake! I LOVE this cake! Almond, chocolate, orange…what more can you want from a cake?

Ingredients:

200g butter

300g dark chocolate, broken into pieces

100g  Amaretti biscuits

200g ground almonds

350g sugar

8 eggs

Zest of 1 orange

For the Orange Ganache:

300g dark chocolate, at least 70 % cocoa solids

300ml cream

2 tablespoons Grand marnier or Cointreau


Method:


  1. Preheat the oven to 180°C ,Fan 170°C ,Gas Mark 4, grease 2 spring 22 cm/9 inch release tins and line the bases with baking paper.
  2. Place the chocolate and butter in a bowl and stand over a saucepan of just simmering water until melted, ensuring the bottom of the bowl is not in contact with the water. Allow to cool slightly
  3. Put the biscuits, almonds and sugar into the food processor and blitz until all are finely ground, add the eggs (one at a time) and blitz again.
  4. Add the melted chocolate to the food processor and blitz, the sir in the orange zest.
  5. Pour half the mixture into each cake tin.
  6. Bake for about 35 minutes – when the cakes are ready, they will have risen started to crack at the top.
  7. Leave to cool for 10 minutes then release the clips. They will come out of the tin very easily. Allow to cool fully on a wire rack.
  8. Peel the paper off the bottom of the cakes and cut in half widthways.

For the Orange Ganache:

Place the cream in a pan over a gentle heat and bring to the boil.

Remove from the heat and add the chocolate & Grand Marnier. Stir until the chocolate has melted.

To assemble the cake:

Place one disc of the cake on a plate or cake stand and cover with some of the ganache

Layer the cakes on top of one another using the ganache in between each to hold each piece together.

Using a palette knife, spread the rest of the ganache over the cake. You can keep a jug of boiling water beside you to dip the palette knife into if it is getting a bit sticky.

Decorate with some of the orange zest sprinkled on top.

Mini Christmas Cakes

Individual Mini Christmas Cakes

I have been making these mini Christmas cakes for about 5 years now and they always go down very well with both my family and with the students at my Christmas cookery classes.

I took inspiration from Nigella Lawson’s recipe for Christmas cake with the addition of chestnut puree. I like the texture and earthy flavour of it in these cakes but leave it out if you wish.

 I love these mini cakes for two reasons! Firstly, they are very quick and easy to make and don’t take weeks of planning in advance. You can decide to make them a couple of days before Christmas and make them at the drop of a hat! Secondly, I love individualising them for the various different members of my family. Sometimes I write everybody’s name on the top of each in icing.

If you are struggling to find mini cake tins, just do what I did and use empty tuna tins! I also use mini loaf tins too.

You can of course make just one large Christmas cake if you would prefer. If doing one cake, use a 9” tin and increase the baking time to 1 ½ hours.

Mini Christmas Cakes

(Makes 10-12 mini cakes)

Ingredients:

225g Sultanas

225g Raisins

110g Candied Peel

75g Dates

75g Apricots

50g Currants

25g Crystallized Ginger

125mls Sherry

175g Butter

250g Light Muscovado Sugar

250g Chestnut Puree

Juice and Zest of 1 orange

Zest of 1 Lemon

3 Eggs, beaten

250g of Plain Flour

½ Teaspoon of baking powder

¼ Teaspoon of cinnamon

¼ Teaspoon of ground cloves

¼ Teaspoon of ground nutmeg

¼ Teaspoon of mixed spice

To decorate:

Apricot jam, smooth

1  pack of marzipan or homemade almond paste

1  pack of ready to roll icing

Method:


  1. Place the sultanas, raisins, candied peel, dates, apricots, currants and crystallized ginger into a bowl.
  2. Pour sherry over and mix thoroughly
  3. Pre-heat the oven to 150˚C , 140˚C Fan, Gas mark 2
  4. Grease the mini cake tins and line with grease proof paper
  5. Place the fruit into a wide bottomed pot with the sugar, butter, chestnut puree, orange juice and zests
  6. Bring to the boil gently and simmer for 10 minutes, stirring every now and then
  7. Turn off the heat and leave to cool for 10 minutes
  8. Add the flour, baking powder, nutmeg, cloves, cinnamon and ginger and stir
  9. Add the beaten eggs
  10. Spoon the mixture into the prepared tins
  11. Bake for 1 hour, checking regularly as the length of time depends on the size of your cake tins
  12. Check the cakes are ready by inserting a skewer, if it comes out clean they are ready, if the skewer comes out wet they need to be returned to the oven
  13. When they are ready, leave to cool and then remove from the tins.
  14. To decorate the cakes, heat the apricot jam and brush onto the cakes
  15. Warm the marzipand a little in your hands to make it pliable, but no too much or it will start to seep oil
  16. Roll out the marzipan with a little icing sugar if it is sticky
  17. Cut out the shape of the cake in the marzipan and place a the marzipan on the top
  18. Roll out the icing and using the tins you have made the cakes in, cut out the icing so that it is bigger than the cake (allowing enough for the side of the cakes to be covered)
  19. Place the icing over the cake and tuck in at the bottom, trimming as necessary.

Decorate however you wish!


Saffron & Cardamom Baked Custard Tartlets with Pistachio Dust & a visit to L'Aube Safran, Provence

I made my annual visit to Paula at A Table en Provence a few weeks ago. Paula runs food & wine tours as well as cookery lessons from Vacqueras every summer. For more about Provence, click here.

As always, I had a lovely time-Provence is a wonderful place for a food lover (not to mention the wine!). One of the highlights this year, however, was a visit to L’Aube Safran, an organic saffron producer near the village of Barroux in the heart of the Dentelles mountains. Francois, the owner explained to me that the saffron threads he produces tend to be thicker and more robust in flavour than saffron produced elsewhere as the weather & soil conditions in Provence are unique to that region. In other words, it benefits from the same dry, clay that vines thrive on with hot summers and bright, sunny winters.

L’Aube Safran is also a gorgeous B&B with cookery classes given by Marie, Francois’ wife in a purpose built demo kitchen.

Francois from L'Aube Safran


Saffron & Cardamom Baked Custard Tartlets with Pistachio Dust

I have been playing around with the saffron over the last few weeks and I will post a couple of recipes but here is the first one!

These tartlets are refreshing and subtly flavoured, ideal after a strongly flavoured or heavy meal.


Ingredients:

(Makes 6)

For the sweet shortcrust pastry:

100 g Plain white flour

50 g chilled butter

1 tblsp icing sugar

1 egg yolk

For the custard:

4 Egg Yolks

250 ml Single Cream

60 g Caster Sugar

7-8 Cardamom Pods

A  large pinch of Saffron threads (about 1 tsp)

To finish:

A little gently whipped Cream (how much is up to you!!)

A handful of Pistachio nuts, very finely chopped (a pestle & mortar or coffee grinder is good for this!)

You will need 6 x 10 cm tartlet tins with removable bases

Method:

Make the pastry first. You can either use a food processor for this or use your hands.

To make by hand, place the flour and butter together in a bowl

Using the tips of your fingers, rub the butter with the flour until it resembles coarse breadcrumbs.

Tip it out on to a lightly floured work surface and,using the heel of your hand, bring together with a little of the egg yolk (try to only add a little of the egg yolk at a time as the less you use the better for a light texture)

To use a food processor, place the butter and flour in the bowl with the blade attachment.

Pulse until it resembles coarse breadcrumbs, then add a small amout of egg yolk.

It should come together very quickly now.

When the pastry has formed into a smooth ball, flatten into a disc shape.

Cover with cling film and refrigerate for at least an hour

Preheat the oven to 180°C, 160°C Fan, 350°F or Gas Mark 4

Roll the pastry out quite thinly (about 1/2 cm)

Using the tartlet tins, cut the pastry into the shape of the tin. Roll these circles out a little more.

Place the pastry in the tins, ensuring the edges are pressed up around the sides

Using a fork, pierce each tartlet a couple of times

Place the tins on a baking tray that is lined with baking paper or tin foil

Bake in the preheated oven for 10 mins

Remove from oven and allow to cool for 5-10 mins while you make the custard.

To remove the seeds from the cardamom pods, either crush in a pestle & mortar or slit open with a knife and remove seeds

Now make the custard.

Place the egg yolks and sugar in a bowl and whisk until the sugar has dissolved into the eggs and the mixture becomes pale in colour. Set aside.

Place the cream in a saucepan with the saffron and cardamom and heat very gently until it just about reaches boiling point. You will be able to see the surface quivering.

Turn the heat off and allow the cream to infuse with the saffron & cardamom for  3 or 4 minutes

Place a strainer over a jug and pour the cream in, removing the saffron & cardamom seeds

Pour a small amount of the flavoured cream into the eggs and whisk (this is to temper the eggs)

Pour the mixture back into the pot along with the rest of the cream

Over a gentle heat, stir the custard until it thickens

When it is thick enough to coat the back of a spoon, remove from the heat and return to the jug.

Pour the custard into each tartlet case until it comes right up to the top

Return to the oven and bake for 25-30 mins or until golden brown on top

Allow to cool for 30 mins before removing from the tins.

Garnish with a dollop of whipped cream and a sprinkling of the pistachio “dust”

Enjoy!


Atul Kocchar’s Mackerel Rechado from Taste of Dublin 2011

With Taste of Dublin coming up this week, it got me thinking of last year’s event and all the fabulous dishes that were cooked at it. I often work backstage at Taste of Dublin with the team from Fairyhouse Cookery School. It is hard work but also great fun. The amount of planning and coordination that goes into ensuring the smooth running of the chef’s demo theatre is phenomenal!

Of all the dishes that were cooked, my favourite one by a long shot was Atul Kocchar’s mackerel rechado. Everybody that tasted it agreed that it was really superb. A fantastic use of spices with a great delicate pairing of star fruit & gooseberry compote. This dish is a fantastic summery meal-light but with plenty of flavour. There is a long list of ingredients but please don’t be put off by that as you may have most of them in your storecupboard and the  method is very straightforward. If you can’t get your hands on all the spices, just use what you can-you will still have a great tasting dish even if it is not exactly as complex as the original. I have omitted the chutney on occasion and still had a great meal!

I won’t be working at it this year but here’s a few pics of last year.

A typical moment backstage


Kevin Thornton

Myself & Billie with Nick Munier & Stephen Gibson

Billie & Catherine Fulvio

Atul Kocchar plating up the mackeral rechado

The original dish at Taste of Dublin

 Ingredients:

Serves 4

4 mackerel, filleted, pin bones removed

For the spice paste:

2 dried red chillis

3 cloves

10 large garlic cloves

1 tsp cumin seeds

1 tsp coriander seeds

1 tsp fennel seeds

8 peppercorns

1 cinnamon stick

6 green cardamom pods

2 tsp ground turmeric

6 Dutch red chillis

1 tsp brown sugar or palm sugar

4 tblsp tamarind pulp

red wine vinegar

Gooseberry Chutney:

200g gooseberries, fresh or frozen

50g apples, cored & chopped

2 tbsp vegetable oil

1 tsp punch phoran (equal quantities nigella seed,  fenugreek, fennel seed, black mustard seed & cumin seed)

1 tsp ginger, chopped

1 tsp coriander powder

1/4 tsp red chilli powder

a pinch of garam masala

1/4 tsp turmeric

50ml red wine vinegar

70g granulated sugar

salt to taste

For the Salad:

2 star fruit, sliced

1 tsp lime juice

1/2 tsp toasted cumin seeds, lightly toasted in a dry frying pan then crushed

a handful of micro greens

1 tsp olive oil

Blend all the ingredients for the spice paste together, adding enough vinegar to make a thick paste. Apply and smear the paste well on the fish fillets.

Cook the fish in a hot oven for 7-10 mins or heat a thin layer of oil in a large frying pan, add the mackeral and fry for about 2-3 mins on each side, until just cooked through.

For the chutney, heat oil in a pan. Add punch phoran-sauté until it crackles.

Add the powdered spices and add the vinegar & sugar followed by the rest of the ingredients.

Cook for 30-40 mins until chutney is cooked and sticky.Cool and serve with the fish.

Mix all the ingredients for the salad together and toss well. Serve the fish, chutney & salad together.

This is a fabulous recipe for mackeral from last year’s Taste of Dublin.